It's a Crazy LIfe…

What craft is Sam working on now?


13 Comments

Upcycled Bird Houses

For something fun, I made birdhouses for my father- in-law for Christmas.  He loves watching the birds in his backyard.  I always give him gifts that he expects and I thought this would surprise him.

9


This project is really easy.  Here is the supply list:

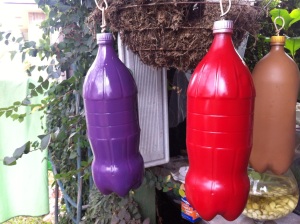
  • 3 empty and clean 2 liter plastic beverage bottles
  • Dremel- needed to drill hole in cap, and to cut top off second and third bottle.
  • drill bit
  • Needle nose pliers
  • Sharp craft knife
  • scissors
  • sand paper
  • hot glue gun
  • spray paint, favorite colors, black, brown, and clear coat.
  • small dowel rods
  • acrylic paint for decorating
  • Heavy wire5

Using Dremel or other power tool, drill a small hole in the bottle cap.

Using heavy wire, make a knot at one end and thread through hole in bottle cap.  Make a loop with wire and twist to make a secure hook.

Lightly sand the bottles top to bottom.  (Sand only top of bottle to label of second & third bottle)  Wipe with a clean cloth.

Spray paint and hang to dry.  I sprayed about 3 coats.

Spray paint second and third bottles in black or brown paint for the roof.


4

Cut the tops off second and third bottles with Dremel right below the lip.  Careful here, if using a knife or other tool.  Make a second cut right above the label of the bottle.  Cutting 1 1/2″ long slits all the way around to make shingles, cut a round edge of each shingle to make a decorative edge.  Cut through one of the slits from top to bottom of roof to secure around the body of the birdhouse.

When happy with the paint, use your glue gun to wrap the roof around the top of the body and secure with a small amount of glue.  Hot glue guns will melt the bottle, so keep it light.

You will find that the roof will not fit around the bottle.  There will be a gap, and this is where you need the third bottle.  Wrap the second roof top around body of birdhouse overlapping so gaps are closed.

6

Using a sharp craft knife, cut the birdhouse door/opening.  I made each one different, and used a heat source to bend the doors open.  You can cut a round or square opening and discard.  I also cut a small X below the door to secure a 2 1/2 ” dowel rod as a perch with hot glue.


So far so good!  They are shaping up right?

Using acrylic craft paints, a sponge and a few brushes, I sponged the grass colors on, made decorative door trims, used stamps to add dragonflies, butterflies and the like.  Add some flowers, bushes and whatnot to make them beautiful!

Clear coat, and you are done!

8


Have fun with this one.  I did!


Leave a comment

Custom Lamp- Fish

All finished. It provides much needed light in the room. I love how it turned out!


No I wouldn’t do it again.

I love it but it was a lot of work.  It will be a family heirloom that I hope my kids will cherish.  ( I think they will)

My father gave me a 36″ log that had been hand cut, and notched from my grandfathers barn that stood on the family property for probably 100 years.  I’ve had it for a couple of years now, and trying to decide what to do with it.  If finally hit me a couple of weeks ago.  I needed a lamp for the living room.

Our decor is lodge style with deer and fish on the walls, so the best idea for my lamp was a carving with fish.

It took me about 2 weeks of time spent at night and weekends.

I did remember to take pictures along the way.  These are the best pics I wanted to share.

Thanks for taking a look…


Planning

Outlining the fish

Carved and sanded, ready for stain.

A closer look at the Bass…


closer look at the Bream


Leave a comment

Disasters with Polyblend non-sanded grouts

Tile with patches of grout embedded in the tile. (this part of the tile doesn’t look real bad, but you didn’t see the worst of it that I didn’t take pictures of… )

OK- so you would think the warnings and instructions would boldly explain the issues you would have with this type of grout on textured or non sealed tiles.  THEY DON’T!

This was the situation…

Tile was grouted, and large patches of grout  remained on the tiles after washing and washing, scrubbing and scrubbing for a couple of hours!  We were about to give up, and live with it.  We took a break and searched the internet with no luck finding a similar problem or solution.  The only thing we found was if you experienced a haze to use a vinegar and water solution.

So we decided to use straight vinegar with a wire and vegetable brush, and  we went at it again.  We were pleasantly surprised that it started coming off!

So for all of you that experience Polyblend non- sanded grout disasters,

try pure vinegar, a brush and a little muscle!

Tile looking good with no grout!


Leave a comment

DIY photo canvas project

This is my idea……..Ok- a new twist to the DIY canvas photo projects from Styrofoam insulation. Cut to an actual frame size and give it a coat of kiltz. Then you can stain it or paint it. Glue photo with mod podge or equivalent, pushing all air bubbles out with a rolling pin or tool of your choice. Let dry overnight & clear coat! I’m in the process of doing this & will let you know how they turn out.

20120914-070719.jpg

Looks like wood!

20120914-200041.jpg

One coat of acrylic…